I know, I know…
“Let’s just have one more IT person blog about how he/she creates accounts for their onboarding process…“
Hear me out
I’m purposely writing this post after just having had my hands on this process for ~2 weeks. If you’ve ever started down the road of automating just the AD account creatoin process, you’ll undertsand just how far the rabbit hole gets when it comes to, what on the surface, seems so quick and simple. It’s almost like the red/blue pill in The Matrix. You kind of want to go back to just creating things in the GUI because you just didn’t want to know about what automation and scripting could do, because you realized it can do so much, but each piece of the puzzle most likely reveals a gap in your workplaces workflow. Soon after taking that red pill you start finding yourself asking questions like:
“Why am I typing these names in again when someone else already has?”
“Why am I having to put notes on a help desk ticket and then manually emailing this department manager the same information?”
“Why is someone filling out a paper form to request an email account?”
“Is there a way I can regurgitate that red pill?”

I get it…sometimes we as IT people cannot solve all the workflow problems in our organizations. Sidebar: If your organization is relying on IT to fix all their workflow problems, then I suggest you start polishing up that resume, because IT will surely not solve all their workflow problems. Technology is simply a tool that can get some items done and save tons of time, resources, and cash, but it cannot drive the car.
Wow. I’ve…really…painted myself into a corner here…
Anyway, this isn’t a super-polished, silver platter, perfect presentation of a script. It’s the start of something that in just the two weeks I’ve been using it already has a ton that can be added, modified, and probably get picked apart by hardcore scripting afficianados. It gets the job done for it’s inteneded purpose initially, but what I like is that it has forced me to really dig deeper into my Powershell resources and books to learn something new. It’s saving me time, and I’m learning something new!
What this script is and is not:
This script is designed for one-off usage. It is not designed to ingest a .csv/.xlsx/.txt file of data and churn out accounts. Will it probably be the basis for that in my shop? You bet! If this structure works out well, then it will most likely morph into the larger bulk account creation monstrosities that we can then put to good use.
This script does not have polished logging. I do have quite a bit of try/catch blocks to at least spit out error mesage to the console that would be helpful to whoever is using it. One of the most important would be, “Hey dude, this account exists alerady!”
So let’s dig in!
When you run this script, you will need to enter three pieces of information:
- User first name
- User last name
- Department (represented by a number)
$UserFirstname = Read-host "Enter the first name of the user whom you want to Onboard"
$UserLastname = Read-Host "Enter the last name of the user whom you want to Onboard"

Write-Host -foregroundcolor Yellow "What Department is this user going to be in?"
Write-host -foregroundcolor Gray "
1>  Manufacturing   2>  Accounting
3>  Department C    4>  Department D
5>  Department E"
Write-Host

$Department = Read-host "Enter the department #"
This is just built out by some simple Read-Host cmdlets and a quick and dirty “menu” of sorts of the different departments to choose from.
One of the new things that I learned in this process is the usage of the switch statement. Microsoft Docs puts it this way when it comes to using the switch statement:
“To check multiple conditions, use a Switch statement. The Switch statement is equivalent to a series of If statements, but it is simpler. The Switch statement lists each condition and an optional action. If a condition obtains, the action is performed.”
It was just easier to input the department and base a set of actions on that value, rather than deal with a series of if statements. The person using this script will actively know the department of the new employee, so why not use that to our advantage.
So I set the $Department variable with the input from the Read-Host statement asking for the department #:
Switch ($Department){
    1 {$Department = "Manufacturing"}
    2 {$Department = "Accounting"}
    3 {$Department = "Department C"}
    4 {$Department = "Department D"}
    5 {$Department = "Department E"}
    }
Now that I have the user’s first/last name, I can now build out the username and the home directory path. My environment utilizes a firstname.lastname convention, so this is is an easy win for me. The only thing I have to do with the input is force all lower-case letters:
$SAMAccountName = ("$UserFirstname" + "." + "$UserLastname").ToLower()
$HomeDrivePath = "\\fs01\users\" + "$SAMAccountName"
Now that those variables are set, I have to build out the initial account. This will build the account with the following parameters:
- Places the account in a “generic” location. The account has to get created somewhere, so I create it in a general OU and the switch statement blocks will move it to where it needs to be, and enables the account
- Sets the password to a generic (temporary) and forces a change on first logon
- Sets the names (SAMaccount, display, etc)
- Sets the description to the chosen value for $Department
- Sets the Office value, this is a static site location for me
I then include a success message for this step so that there is confirmation of the creation, along with the catch side if there is an error and it will be displayed. I then choose to break the script here because if there was a problem in creating it, most likely the rest of the tasks may fail:
try {
    Write-Host
    Write-Host "Creating the inital account: $SAMAccountName..."
    Write-Host
    New-ADUser -Name "$UserFirstname $UserLastname" -GivenName "$UserFirstname" -Surname "$UserLastname" `
        -Path "OU=Users,OU=Site,DC=geeklifenow,DC=com" `
        -UserPrincipalName ("$SAMAccountName" + '@' + "geeklifenow.com") `
        -AccountPassword (ConvertTo-SecureString -AsPlainText "G33kl!feN0w$" -force) `
        -ChangePasswordAtLogon $true `
        -SamAccountName "$SAMAccountName" `
        -Enabled $true `
        -DisplayName "$UserFirstname $UserLastname" `
        -Description "$Department" `
        -Office "Geeklifenow HQ" `
        Write-Host "SUCCESS: The user account: $SAMAccountName has been created!" -ForegroundColor Green
        Write-Host
    }
catch {
    $ErrorMessage = $_.Exception.Message
    Write-Host "WARNING: Error in creating the account: $ErrorMessage" -ForegroundColor Red -BackgroundColor Black
    Write-Host
    Read-Host -Prompt "Press Enter to exit..."
    break
}
Of course, this is where you will pick and choose what you want to be done for all accounts here and then differentiate on the value of the $Department later. My org is simple in terms of AD account information.
Now we move on to the differentiated switch values based on the department. I will show you two of them to give you a feel for the different tasks depending on the department.
I’ll cover the simpler one first. Notice the switch($Department){ at the beginning. This kicks in the switch value based on the number entered for the correlating department. You then match the department “block” so to speak with one of the variables for $Departments. Notice that the entire switch block and each individual part have their own set of {}:
switch($Department){

    "Manufacturing" {

        # Add the groups for the user (off of a template text file)

        $Groups = Get-content "C:\Scripts\DepartmentGroups\Manufacturing.txt"
        Write-Host "Adding the account to the following AD security groups: $Groups"
        Write-Host
        try {
            foreach ($Group in $Groups){
            Add-ADGroupMember -Identity "$Group" -Members "$SAMAccountName"
            }
            Write-Host "SUCCESS" -ForegroundColor Green
            Write-Host
            }
        catch {
            $ErrorMessage = $_.Exception.Message
            Write-Host "WARNING: Error in adding to AD security groups: $ErrorMessage" -ForegroundColor Red -BackgroundColor Black
            Write-Host
            Read-Host -Prompt "Press Enter to exit..."
            break
        }
.
.
.
What I do is create pre-filled .txt files for each department, given that the group memberships for new accounts don’t really change much, if any. All that is in the .txt file is the AD security group name(s) [one per line] As you can also see, I have a success/fail structure set with the try/catch block.
.
.
.
Write-Host "Moving AD user object to its proper OU..."
        Write-Host
        try {
            Get-ADUser -Identity $SAMAccountName | Move-ADObject -TargetPath "OU=Manufacturing,OU=Users,DC=geeklifenow,DC=com"
            Write-Host "SUCCESS" -ForegroundColor Green
            Write-Host
        }
        catch {
            $ErrorMessage = $_.Exception.Message
            Write-Host "WARNING: Error in moving to OU: $ErrorMessage" -ForegroundColor Red -BackgroundColor Black
            Write-Host
            Read-Host -Prompt "Press Enter to exit..."
            break
        }

        $SmtpTo = "geek@geeklifenow.com"
        $body = "<HTML><HEAD><META http-equiv=""Content-Type"" content=""text/html; charset=iso-8859-1"" /><TITLE></TITLE></HEAD>"
        $body += "<BODY bgcolor=""#FFFFFF"" style=""font-size: Small; font-family: TAHOMA; color: #000000""><P>"
        $body += "Dear <b><font color=red>Manufacturing Team,</b></font><br>"
        $body += "<br>"
        $body += "This is an notification of a newly created domain account.<br>"
        $body += "<br>"
        $body += "<b>$SAMAccountName</b> has been created and is ready to be used.<br>"
        $body += "<br>"
        $body += "The password for this account is <b>G33kl!feN0w$</b> and the user will be prompted to change it upon 1st login.<br>"
        $body += "<br>"
        $body += "- GeekLifeNow IT Department"

        try {
            Send-MailMessage -To $SmtpTo -From $SmtpFrom -Subject $MessageSubject -SmtpServer $SmtpServer -Body $body -BodyAsHtml
        }
        catch {
            $ErrorMessage = $_.Exception.Message
            Write-Host "WARNING: Error in sending email notification: $ErrorMessage" -ForegroundColor Red -BackgroundColor Black
            Write-Host
            Read-Host -Prompt "Press Enter to exit..."
            break
        }

        Write-Host "Account created and staged successfully!"
        Write-Host
        Read-Host -Prompt "Press Enter to exit"

    }
.
.
.
This section moves the object to the correct OU and then sends an email message that is built out to an email address. You can add extra email addresses in the $SmtpTo variable by separating them with commas. Our SMTP solution does not require authentication, so it’s straightforward. As you can see, the body of the email is built line by line. This may look messy…and very well might be messy, but I’m just learning the ins/outs of the Send-MailMessage cmdlet. This is one of those red pill moments where you start thinking about who to contact given which department is chosen. Also, I set some of the Send-MailMessage variables in the beginning of the script:
$SmtpServer = "XX.XX.XX.XX"
$SmtpFrom = "morpheus@thematrix.net"
$MessageSubject = "New Domain Account Creation"
Notice that I follow up each catch with a break command to stop the script should any part fail. This way the catch and error message will indicate where the problem is. I then have a final success message and a Read-Host so the console window doesn’t disappear and you don’t get a chance to read the success/error lines.
The next example, I’ll just display the part that is different from the previous example. What makes this one different is the need for a defined home drive letter/path/folder.
Write-Host "Setting the home drive letter to G: and and adding the path..."
        Write-Host
        try {
            Set-ADUser -Identity $SAMAccountName -HomeDrive "G:" -HomeDirectory $HomeDrivePath
            Write-Host "SUCCESS" -ForegroundColor Green
            Write-Host
        }
        catch {
            $ErrorMessage = $_.Exception.Message
            Write-Host "WARNING: Error in setting the home drive letter/path: $ErrorMessage" -ForegroundColor Red -BackgroundColor Black
            Write-Host
            Read-Host -Prompt "Press Enter to exit..."
            break
        }
        Write-Host "Creating the home folder and setting permissions..."
        Write-Host
        try {
            $HomeShare = New-Item -Path $HomeDrivePath -ItemType Directory -Force
            $ACL = Get-Acl $HomeShare
            $AccessRule = New-Object System.Security.AccessControl.FileSystemAccessRule ("GEEKLIFE\$SAMAccountName", "Modify", "ContainerInherit, ObjectInherit", "InheritOnly", "Allow")
            $ACL.AddAccessRule($AccessRule)
            $AccessRule = New-Object System.Security.AccessControl.FileSystemAccessRule ("GEEKLIFE\$SAMAccountName", "Modify", "None", "InheritOnly", "Allow")
            $ACL.AddAccessRule($AccessRule)
            Set-Acl -Path $HomeShare -AclObject $ACL
            Write-Host "SUCCESS" -ForegroundColor Green
            Write-Host
        }
        catch {
            $ErrorMessage = $_.Exception.Message
            Write-Host "WARNING: Error in creating the home drive folder: $ErrorMessage" -ForegroundColor Red -BackgroundColor Black
            Write-Host
            Read-Host -Prompt "Press Enter to exit..."
            break
        }
.
.
.
The first part of this is pretty straightforward. Setting the home drive letter/path is easy. The tricky part, at least for me, was not creating the folder on the file server, but setting the proper permissions on the share. I had to do lot of trial/error to get this right to what I needed it to be. For my environment, I wanted users to essentially to have Modify rights for “This folder, sub-folders, and files…“. Seems the only way to accomplish this was to do it in two parts. That is why you see two $ACL.AddAccessRule($AccessRule) statements. I couldn’t get it to take in one action. When I tried, I could only get modify rights on sub-folders and files only. The Google was my friend in this endeavor. And, of course this was followed up by the Send-MailMessage piece from the previous example, and then the final “SUCCESS” message.
Here is what the console output would look like on a successful account creation:
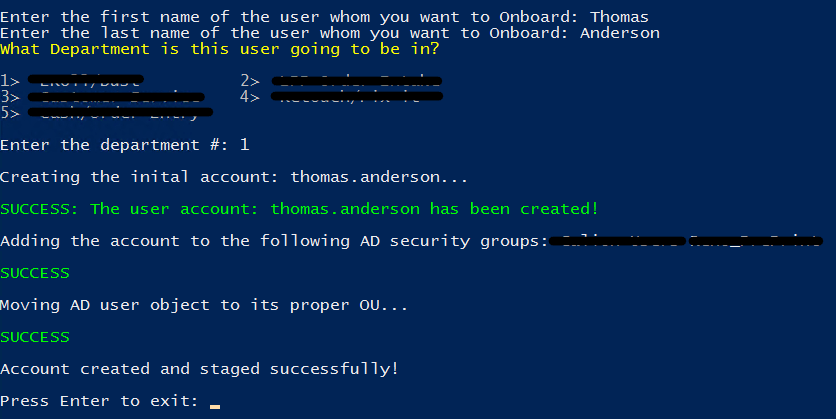
You’ll have the forgive the added empty Write-Host lines…I’m kind of OCD about how the output looks in the console. I didn’t care to have each line butting up against each other. There’s probably a way to get that to happen without the extra lines, but I haven’t gotten to that nugget yet!
Wrap-Up
As I stated earlier, this is still in a very raw form. I purposely chose to share this because you could go into so many different directions with this framework. It literally can branch off into a bulk account creation job, a webpage front-end, help desk integration, and I’ve even thought about plugging this into a Jenkins dev environment. There’s just SO much you can do from here…which brings us back to the red/blue pill…
Just know that if you take the red pill, you can’t go back to the GUI. Your brain just might explode with all the possibilities!
I sure hope this was helpful to you fellow geeks, techies, and sysadmins!
You can check out my AD-onboarding GitHub repo for this and other scripts that may help you.