As our environments grow and as other IT entities and silos request more and more agents, monitoring applications, and services it can get daunting keeping up with the versions that are running. Some IT groups are notorious for requesting that certain apps or agents to be at a certain level, and sometimes for good reason. You certainly want to be using a supported version of monitoring software or other security-related applications.
On the shoulders of giants!
I always make sure I give credit to where it is due. In this case, the script that this is based around is called Get-RemoteProgram. This is an extremely powerful PowerShell function authored by Jaap Brasser and can be found on TechNet here, which is exactly where I stumbled upon it. The function is not only powerful, but Jaap was stellar in making great comments and putting in various examples of how this could be used! One thing I absolutely love about the PowerShell community is the environment of sharing and collaboration that takes place. I’m hoping that even one other person would stumble on this explanation of how I use this to help them in their environment.
Let’s start with a simple use scenario…
The beauty of this function is that is can be extremely helpful in both larger and complex workflows, but it is also very useful to use on the fly. How many times have we as IT support people in general have been asked, “Hey, can you tell me if this server has xyz software, and if so, what version?” We’ve also been faced with having to upgrade software on a group of servers or computers and would like to narrow down our scope to just the machines we need to upgrade and leave the compliant ones alone.
The first thing you will need to do is save the .ps1 file somewhere on your PC. This is written as a function, which basically means it needs to be loaded into a running PowerShell session to be called upon. You can do that by navigating your session to the directory that the Get-RemoteProgram.ps1 file resides. Then you will need to what the gurus call “dot-source” the file, which basically gives you the added features of the function in your current session:
C:\Scripts> . .\Get-RemoteProgram.ps1
For this particular function, you won’t get any output which means that now your session has the added capabilities from this function! You now have access to an added set of cmdlets and parameters at your disposal. You call on these by using the now-available cmdlet, Get-RemoteProgram.
Let’s use an extremely simple example that looks at the local machine for a program…let’s say the Google Chrome browser:
Get-RemoteProgram -IncludeProgram 'Google Chrome'
This will return an output like so:
ComputerName  ProgramName
------------  -----------
MY-PC         Google Chrome
The fact that there is an output basically means that Google Chrome is installed. If no output is given, then the program is not found. Notice the parameter -IncludeProgram. That is not a typical PowerShell parameter, but it was created when you loaded the function at the beginning of the session. What is also nice is that you can use the * for wildcard names as well. You could look for any program starting with Google by using the parameter value of Google* for -IncludeProgram.
So, to move this to checking on a remote server or PC, you would just simply add the -ComputerName parameter and a value to go and grab the same information from a remote machine:
Get-RemoteProgram -ComputerName WEBSVR01 -IncludeProgram 'Google Chrome'
If the computer WEBSVR01 has Google Chrome installed, and you are running this with an account that has admin privileges on WEBSVR01 you will see the same output we saw before, just with the corresponding computer name listed.
Let’s go one step further and scout the version of software we are looking for:
Get-RemoteProgram -ComputerName WEBSVR01 -IncludeProgram 'Google Chrome' -Property DisplayVersion
You would get the same listing, just with the added column, DisplayVersion:
ComputerName  ProgramName    DisplayVersion
------------  -----------    --------------
WEBSVR01      Google Chrome  87.0.4280.88
So as you can see, this can be very powerful to use in an ad-hoc situation because the parameters are self-explanatory and fit right in with the nomenclature of the PowerShell vocabulary so it doesn’t take long to be able to run these commands on the fly without having to consult documentation every time you go to use it. Check out the comments in the function itself to see many more ways to use this, such as gathering the msiexec uninstall strings so you can automate remote and silent uninstalls. There is so much this can be used for!
Taking it up a notch…
Ad-hoc, one-off uses are fine and dandy. But it’s time to make this function angry and let it morph into the Incredible Bulk!!!
…OK, so I just Googled that name on the off chance of finding a geeky IT version of the Marvel hero and realized that is a term for a popular strain of cannabis plant. I now feel like I need to take up the campaign of taking this term and branding it for IT automation!

There isn’t really a ton to add to this already great function to use it in bulk. Below, I have added the framework to either search by OU using Get-ADComputer or by using Get-Content to use a static .txt file that has a listing of computer names. Using the original .ps1 file, I dropped the code below at the end of that file and saved it as a separate .ps1 file and it’s all-encompassing. It will load the function and use the code to do the search:
$Property = 'DisplayVersion'

Get-ADComputer -Filter * -SearchBase 'OU=Servers,DC=Company,DC=com' -Properties Name | Select-Object -ExpandProperty Name | ForEach-Object {
    try {
        $ComputerName = $_
        Get-RemoteProgram -ComputerName $ComputerName -Property $Property -ErrorAction Stop | Where-Object {$_.ProgramName -like "SolarWinds*" -or $_.ProgramName -like "Check_MK Agent" -or $_.ProgramName -eq "Sentinel Agent" -or $_.ProgramName -eq "McAfee Agent" -or $_.ProgramName -eq "VMware Tools"} | Select-Object *,Error
    }
    catch {
        Write-Host $ComputerName 'may be offline!'
        $ErrorMessage = $_
        [PSCustomObject]@{
            ComputerName = $ComputerName
            ProgramName = 'N/A'
            $Property = 'N/A'
            Error = $ErrorMessage
        }
    }
} | Export-Csv -Path C:\RemoteProgramManifest.csv -NoTypeInformation -Append
This particular code uses an OU search in Active Directory to gather the computer names to check and then checks for the following apps/agents:
- SolarWinds Agent (multiple kinds, using the wildcard *)
- Check_MK Agent
- Sentinel Agent
- McAfee Agent
- VMware Tools
It then collects all this information in a .csv that we can then use to get a bird’s eye view of what is installed where. I also wanted to catch any errors, which in my case 98% of the time the host is probably offline. I have this called out in the console while running it, and also have the error captured in the output file for reference. Notice the [PSCustomObject] is created, and from my memory it is there to fill in the fields that would normally have the software name and version because each line in the output needed to have something in each column to properly construct the output. There could very well be a way to ‘skip’ these in the output, but it actually is beneficial to see the ‘N/A’s because that may cause me to check on the host if it is a host that I know would be online and up. If you get no output in the console, then everything was checked and your .csv is ready to view!
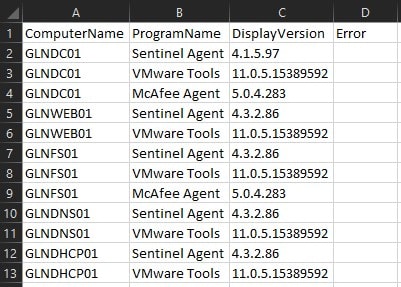
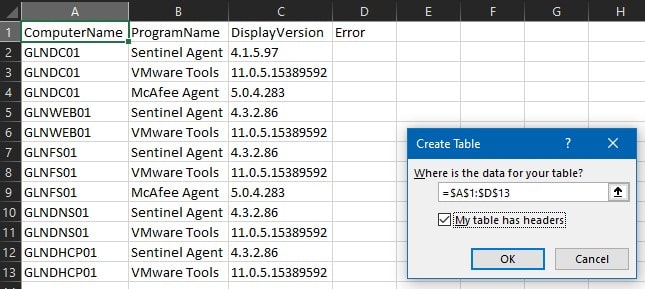
Notice that all the found software was documented along with its corresponding versions. The messy part is that each listing of software has a separate row with the listed host. Luckily, a team member I work with found a solution in Microsoft Excel…Pivot Column to the rescue! He found a wonderful little posted GIF here that literally walked me through how to arrange this data so that I could easily see how my environment was looking in terms of compliance and consistency. It’s a tad different in how it aggregated the data in the example, so I’ll walk you through exactly what you need to do in Excel to get the same results. In order to do this, go ahead and save your .csv as a traditional Excel (.xlsx) file and turn on filtering for all the columns. Next, select Data in the menu bar and then select From Table/Range in the ribbon. Excel will likely grab everything you need like so. Just select My table has headers and click OK:
Power Query Editor should come up automatically. Then click the Transform tab, highlight the ProgramName and DisplayVersion columns in Power Query Editor. Then click Pivot Column in the ribbon and the pivot column “wizard” will pop up:
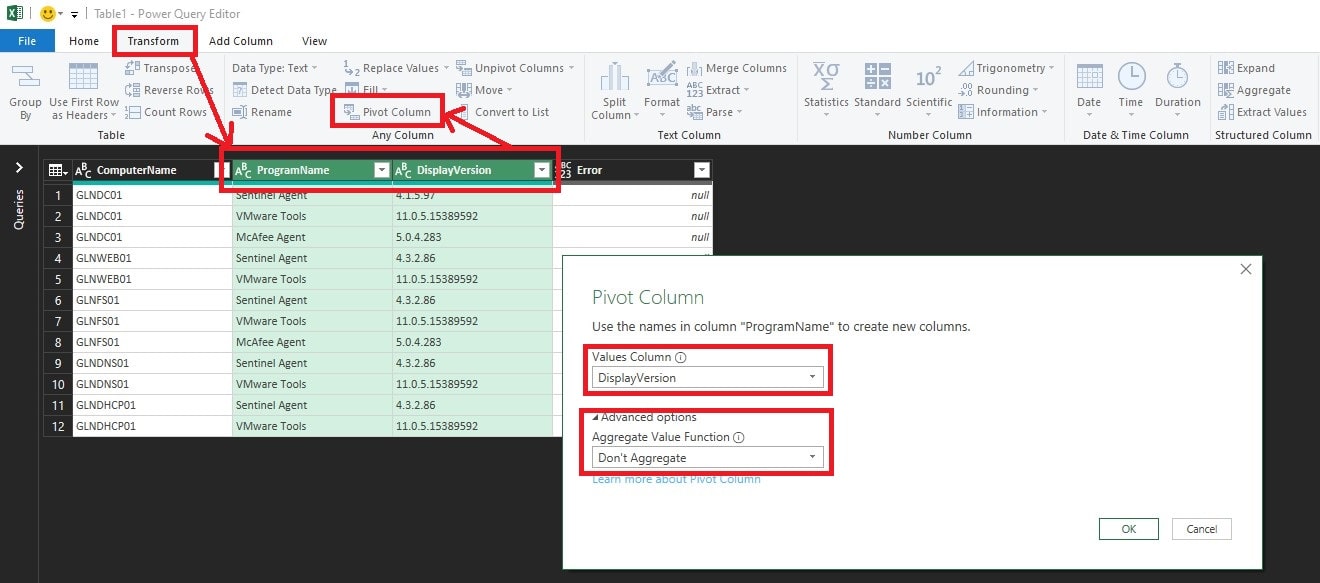
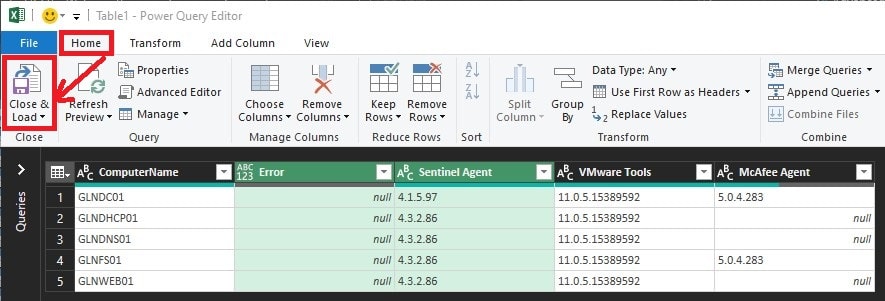
Keep DisplayVersion in the Values Column drop-down field and then click Advanced options and select Don’t Aggregate in the drop-down and then click OK. Your data is then arranged properly inside of Power Query Editor. Now just click Home in the menu bar of Power Query Editor and then click Close & Load to exit and get back to your data. You now have each host in your listing listed once with the corresponding program names as column headers and version numbers in corresponding rows! Notice that if the cell is blank for a version number, then that program was not found on that host, which is also an added benefit to catch any hosts that don’t have something that they should have.
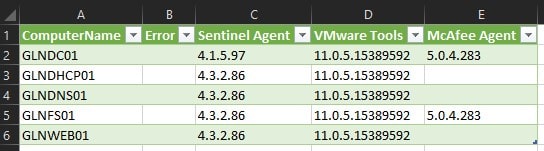
Now you can arrange columns and data as you see fit to create the report you need to or to filter where you may need to focus your efforts in level-setting your environment. This becomes a very important task in environments like my own, in which only certain times of the year do I have a window of opportunity to make the needed changes to critical servers. Getting this done before those maintenance windows allows me to be much more prepared to take the necessary actions to get my environment to where I need it to be going forward.
Happy scouting!
I hope that this walk-through will help some of you SysAdmins and IT support folks out there to shave a little bit of time off of a sometimes tedious and daunting task like this. Of course, if your environment has enterprise-level tools like SCCM, LanSweeper, BigFix and the like this isn’t much of an issue. But lots of you may not have access to those fancy yet costly tools. This literally is free, paid for by people like Jaap Brasser with their gift of time in developing PowerShell tools for the community to share. Please share this post to some of your fellow brothers and sisters in the IT trenches that may need something like this! I also have this script hosted in my Power-Shell-Automation GitHub repo for you to grab as well.
Happy scouting!